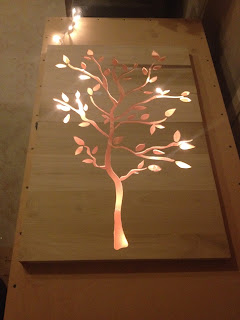
Hey everyone hope you're all having a good week and welcome back to Rustic DIY Projects! This week I tried out something a little different. Recently I've been wanting to incorporate more ambient lighting and practicality into my projects and came up with this gem of an idea. The concept of this changed several times throughout the process of building it so things got a little sloppy at some points and there was definitely a great deal of trial and error involved but luckily I was able to salvage this piece from my mistakes and I'm happy with the end result. Hope you all enjoy it!
Tools/Supplies Used
Drill
Impact Drill
Jigsaw
Dremel
Spring Clamps (a lot...)
Carbon Paper
Painters Tape
Pencil
Rag
Thin Paint Brush
Wood Glue
Walnut Stain (Oil Based)
Mosaic LED String Lights
Sanding Sponges (grits: 80, 120, 180)
Deck Screws (2 inch)
Saw-tooth Mounting Bracket
24 inch by 36 inch image print (whatever image you're trying to do)
4 x Square Dowels (36 inch)
5 x Thin Poplar Boards (5.5 inch x 24 inch)
1 x Thin Poplar Board (3 inch x 24 inch)
Step One
For the first step I took two of my 36 inch dowels and cut them to 22 inches long. These made up the bottom and top of my frame and were placed between the other two 36 inch dowels. Once in place I clamped them, pre-drilled a screw hole, and screwed them in using a 2 inch deck screw. After that I took some poplar boards I bought pre-cut at Lowes and placed them on the frame making sure I wasn't able to see the frame behind them. After everything was nice and tidy I glued them all in place and clamped them down for the rest of the day.
Note: Make sure if you try this yourself that you glue all these boards together as well. If you want to know why then read Step Four.
Step Two
The next day everything was good and tight. I took out some carbon paper and covered the surface with it then taped the outer edges with some painter's tape I had lying around. After everything was in place I laid my image print on top of the carbon paper and secured it in place with some clamps while I started the arduous task of tracing the outline.
Note: If you're going to try this out just make sure you consider the amount of detail in the image you decide to go with. I chose a pretty simple looking tree yet it took me days (yes days) to complete this project due to the amount of tracing, cutting, refining, sanding, damage control, in crack staining, ect. so just keep that in mind while picking your image.
Step Three
Alright now that my outline is nicely transferred over I pre drilled some holes at several key points on the tree to help with the cutout process. I made sure to use a drill bit big enough to fit my jigsaw blade through so things wouldn't be sloppy.
Note: I outfitted my jigsaw with a smaller gauged blade to make the curves and turns easier. They sell jigsaw blades that are essentially scroll blades at most home improvement stores. These would be preferable for this application.
Step Four
Once I was satisfied with all my pre drilled holes I started cutting away. It was at this point I realized I forgot a step and made a horrible mistake. Though I DID glue all the boards to the frame I neglected to glue them to each other! *FACEPALM* Because of this, several areas between branches I wanted to keep kept falling through and had to be re-glued. This wasn't the end of the world but still posed a huge setback that could have all been avoided had I just remembered to glue all the boards together. Definitely won't be making that mistake again. Ever...
 |
| Ugh... |
 |
| Was not happy about this... |
 |
| Emergency damage control to re-glue all severed pieces. |
Alright disaster adverted, now that the box was finally back in decent shape I sanded all the inner cuts smooth with a Dremel and a sanding bit. After that I used 80, 120, and 180 grit sanding sponges to sand the surface smooth before staining it with Walnut oil based stain. HOWEVER the small cuts were difficult to get in and stain so I had to use a paint brush. This took forever, not a fun time. Once finished I nailed a saw-tooth mounting bracket into the top middle section of the frame,
 |
| Testing it out to see if it'll look alright. |
 |
| This was a pain in the butt. |
Step Six
The next day I took a trip down to Lowes and bought a Mosaic Mutlicolor LED Strip and an extension (because the original didn't fit the whole inside of the frame). I took it home and lined the inside edges of the frame with it and it looked great! Sorry no pictures of this step but I mounted it up, turned out the lights,and below you'll see the result.
Done! I originally planned on using batteries and a side switch to toggle on and off the power but this would have been impractical as I'd be going through batteries like crazy to keep this powered all the time. That hanging cable might be ugly but there's ways to hide it I'll look into later.
Follow me on Facebook to stay up to date with all my latest news and projects @
And don't forget to check out my Pinterest page too @
Plenty more cool stuff to come so stay tuned!


No comments:
Post a Comment